Monday, June 24, 2013

The Night Time Is The Right Time (to take photos!)

105 second exposure taken after sunset
Taking landscapes after sunset, if done correctly, can produce some amazing results.  It is one of my favorite styles of photography but isn't as straightforward as shooting during the day.  Once you learn the basics on how photography works at night, the possibilities for unique and creative photos are endless.  With the right equipment and a basic knowledge of the fundamentals of photography, one can take a unique photograph that shows a scene in a way we can't see in person. 


Headlights from oncoming cars illuminate the forground

To start things off lets go over the basics.  Photography is all about the capture of light.  That principle stays the same no matter what time a photo is taken and is part of what makes night photography so intriguing.  Since there is less visible light at night than during the day it is necessary to use a longer exposure to get an image that is adequately exposed.  Once you start dealing with exposures longer than 1/60th of a second, having a good quality tripod becomes essential for creating sharp images.  There are many tripods out there but I currently use a Feisol 3441-T  carbon fiber tripod/head combo.  I've also have the less expensive but larger Manfrotto 055XPROB aluminum tripod with 498RC2 head and used it with great results. 

In camera, you are limited to the maximum exposure time of 30" which may seem like a long time but there are applications where exposures longer than 30" are necessary.  With a intervalometer, you have the ability to use "Bulb" mode to take exposures for as long as you wish.  I recommend this affordable off-brand intervalometer which I use that does a fine job but only costs a fraction of what Canon's does.  I always use aperture priority mode and set my aperture based off of the depth of field I want for the exposure.  I then lock in the ISO at 100 and let the camera meter the shot.  I find that setting the EV to +1 is the way to go as it gives more shadow details.  I then take a look at that exposure and make changes if necessary.

For night landscape photography, it can be difficult to light the foreground of a scene when exposing for the night sky.  There are a couple ways to light the foreground.  First, you can take an exposure optimized for the sky, then take another one optimized for the foreground and can blend them together in post-processing.
Flashlight was used to "paint" the foreground of this shot
The other way is to use a flashlight to light up the foreground.  This technique is called "light painting" and is a lot of fun to do.  It is simple, just take a flashlight and shine it on the area you want to light up.  It is usually a good idea to paint in small circles, constantly moving the flashlight so that the foreground is lit up aquatically and evenly.  You can even get in front of the camera and paint a larger area.  As long as you are continually moving and there won't be a trace of you in the frame.  Be careful not shine the light directly into the camera as it will ruin the exposure.   It takes some practice but light-painting gives you the option to be creative.  Try using different color lights, selectively painting areas you would like to highlight, or using multiple lights and you can create a variety of effects.

Choosing a composition for night photography is similar to photography during the day except you don't need to worry about the sun.  That being said the sun does influence the sky during twilight.  Although the sun has set and there is no longer visible color in the sky that doesn't mean it is time to pack up your gear and go home.  In fact some of the more spectacular images are taken during this time of limbo between light and dark which is called the "blue hour" by photographers as the sky is a rich blue color and some of the residual colors of sunset still remain.  This period is sacred to photographers as the light is at its best.  Later on in the night the sun isn't a factor but you may notice light pollution coming from cities and towns that can dominate your frame.  The lights are much brighter than can be seen with the naked eye and can create some neat effects and colors if used to your advantage.


Stay tuned for Part 2 of this post concerning astro-photography, star trails, and photographing the Milky Way and as always if anyone has any questions about this post, reply below and I'll do my best to answer them. 


Tuesday, June 11, 2013

Lightroom 5, Is Photoshop Necessary Anymore?


 Adobe has just released their new version of Lightroom, available for for $150 for new customers and only $80 for users upgrading from Lightroom 4.  Lightroom 5 is also available for users of the Adobe Creative Cloud for $50 a month along with their whole Creative Suite.

The big question here is if the upgrade is worth the money.  I've tested the beta version of Lightroom 5 and was very impressed with some of the new features, especially the enhanced ability of the "spot removal" tool to now act very much like Photoshop's "clone" tool.  Adobe claims to have completely redone the algorithms behind the tool, improving it's ability to create a more realistic look.  With their old "spot removal" tool from Lightoom 4 it was very difficult to get any realistic results and it was usually necessary to go into Photoshop to get the desired result.

Another cool new feature in Lightroom 5 is the radial mask tool.  I had the opportunity  to use this feature editing a friend's botched wedding photographs to try to salvage a few shots.  The whole concept of a mask in Lightroom is new and it does not resemble Photoshop's masks, it is much easier to understand and manipulate.  It is extremely powerful for highlighting part of a photograph or to make a variety of other changes to contrast, shadows, highlights, clarity, or any of Lightroom's sliders.  Where in Photoshop masks can be complicated and hard to master, masks in Lightroom are intuitive and easy to use without any experience.

The new "Upright" tool is also very interesting, especially for architecture/landscape photographers.  Most of this ability is in Lightroom 4 but Lightroom 5 introduces automated corrections that do a remarkably good job of straightening horizontal and vertical lines of buildings or bridges as well as evening out horizons with one click.  This can save a lot of time when batch processing photos and gives you one less thing to worry about.  This feature also includes an automatic chromatic aberration removal button. 

As a landscape and portrait photographer, I rarely use Adobe Photoshop CS 6 and when I do it is mainly to do some minor cloning.  With a $900 price tag, this can be an expensive feature and with Adobe now moving Photoshop to a subscription only service via the Creative Cloud, one would no longer even own the software. At $50 a month (assuming no price increases) one would have to pay $6,000 for Photoshop and it's family of software in 10 years of use and if they didn't have enough money to pay Adobe that next month, they would lose their ability to produce work.

For new photographers, I wouldn't recommend buying Photoshop as it is has become a behemoth of a program that is not very intuitive.   Lightroom on the other-hand is a very easy to use tool that is very powerful for photographers of all sizes of workflows.  It seems that Adobe is placing Lightroom to fill the amateur/semi-pro photographer niche while taking Photoshop out of that spot and marketing it towards professional studios.   

While Adobe makes this transition, they have been continually adding features from Photoshop into Lightroom and  have revamped some of the features making them better in Lightroom than in Photoshop.  In this latest offering, Adobe has given photographers the ability to do the majority of processing in Lightroom without taking the time and effort of taking their photo into Photoshop to do further editing.

Don't get me wrong, Photoshop is a very powerful program but caters for a much larger audience than just photographers.  Many of the features that photographers use in Photoshop weren't created with them in mind.  In Lightroom, however, photographer's and their workflow are  the first priority and it shows.  For those who currently have Lightroom 4, I would still suggest the upgrade to Lightroom 5 as the new features in Lightroom 5 make it a much more powerful post-proccessing program with the ability to replace Photoshop in your workflow.

Personally I'm going to make the upgrade soon and will continue to use the NIK Software package to supplement my Lightroom editing, hopefully phasing out Photoshop from my workflow. 


Sunday, June 9, 2013

HDR Photography, Overused or Underappreciated?

5 Shot HDR (+/- 3 EV)
Today's digital camera sensors have a limited dynamic range when compared to human vision.  A digital camera sensor can only record a range of 10 stops of light at a time.  There are times where a scene has a bright light source as well as dark shadows creating a greater dynamic range than what a digital camera sensor can read.  Where human eyes can see detail in both the shadows and highlights at the same time, a camera sensor can not and the photo may not come out as expected.  When taking a photo of a scene like this it is necessary to "clip" or lose detail in either the shadows or the highlights.  This causes completely black or white areas of an image depending on where you set your exposure.

High Dynamic Range (HDR) photography is a technique in modern digital photography that allows larger range of tones to be shown than can be recorded in a single exposure.  This is done by taking multiple images of the same scene by bracketing exposures, taking an underexposed image at -1 EV, a normal exposure at 0 EV, and an overexposed image at +1 EV.  More images can be taken at further extremes but generally the +/- 3 EV is the farthest it is necessary to go.  It is best to take all of the bracketed exposures in succession and without moving the camera to prevent issues with post-processing.  It is not necessary to use a tripod but it does help during the alignment in post-processing and is necessary for longer exposures.   

In the years since the advent of the HDR photography, some say it has become overused and overdone and will immediately dismiss and belittle a photographer for using the technique.  A lot of this stems from the ability to overdo HDR processing and using the HDR technique for situations for which it isn't called for.  HDR photography is not going to improve a badly composed image and it isn't the end all be all of photography techniques, rather a tool to be used if the need arises. 

3 Shot HDR (+/- 1 EV)
An important part of HDR photography is restraint.  For example, if a scene can be fully captured with one image, great, no need to do exposure bracketing and use the HDR technique.  However, if both the highlights and the shadows are clipped, bracketing and HDR may be a good idea.  Get used to looking at your histogram and being able to tell the difference between a situation where nothing is being clipped, the shadows are being clipped, the highlights are being clipped, or both the shadows and highlights are being clipped.  When you are in the field, train yourself to think in terms of how the exposure will look on the camera.  To help with this, after taking an exposure look at the histogram for each photo on your camera and based off of what you see, decide if it is worth bracketing exposures and to use the HDR technique.  I tend to use the HDR technique during sunset or sunrise when I'd like to include the sun or colors in the sky in my exposure as well as foreground shadow detail. 

Once you've taken your bracketed exposures, the rest of the HDR process is accomplished in the digital darkroom.  There are 3 programs which will help create a final image from bracketed shots, Adobe Photoshop CS 6, Photomatix, and Nik HDR Efex Pro 2.  All 3 do a good job and there are plenty of tutorials on how to use all of them.  Personally I prefer Nik's HDR Efex Pro which does a great job with creating a good base image that can then be modified to your liking.  Photoshop does a good job with preventing "ghosting" which can be caused if there are discrepancies between your bracketed exposures.  What these programs all have in common is that they take the bracketed exposures, align them, and merge them together into one image.  They then selectively allow you to keep the highlight detail in the greater exposed image while keeping the shadow detail in the lesser exposed image.  The final product is an image that no longer has any highlight or shadow clipping.  This helps to create vibrant colors in the sky of a sunset as well as rich details in the shadows.  It is, however, very easy to overdo it with HDR photography processing.

My best advice is to make the photo look as realistic as possible and to only use as much compression as necessary to avoid highlight clipping.  Think of HDR photography as another tool in your toolbox, a way to help capture a scene the way you experience it.  Use it to your advantage and keep the processing to a minimum and I think you'll agree that HDR processing is here to stay.  

5 Shot HDR (+/- 3 EV)

Wednesday, June 5, 2013

Essentials of Long Exposure Photography


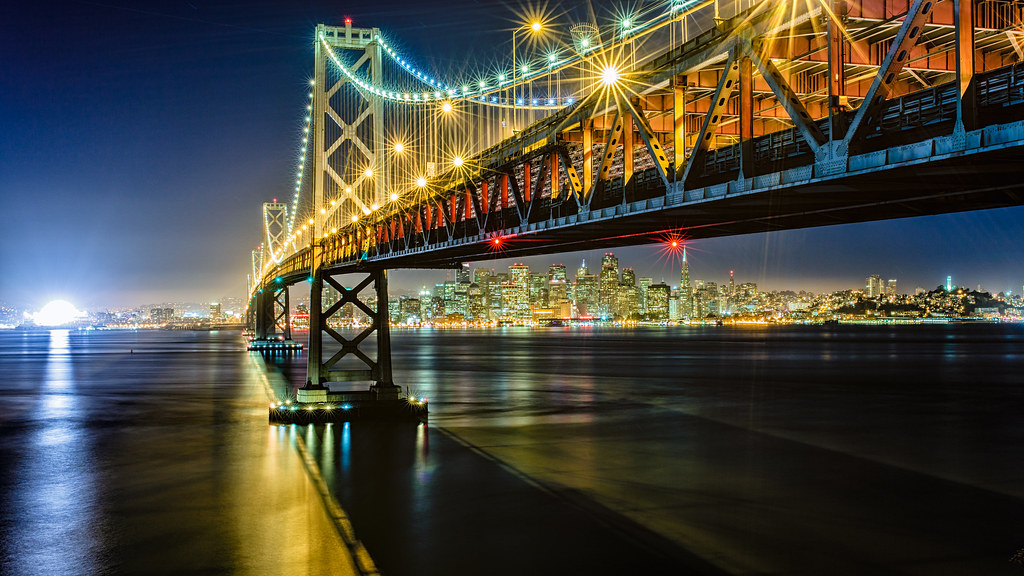
When people think of photography they usually think of a snapshot that freezes a moment of time in a frame at 1/1000th of a second or shorter.  However, photography can be much more than that with the correct gear or conditions.  Long exposure photography is only possible naturally during the night and can produce interesting effects of motion blur effects or star trails.  I will go into star trails and night photography in another post but here's an example of where a long (30 second) exposure can be used to create blur in passing car's headlights.  No filter was need for this photo since base ISO was used. 
30" exposure after sunset using no filters
It is possible to shoot long exposures during the day but it requires neutral density (ND) filters which are dark pieces of glass that block the majority of light from entering the camera and being registered by the sensor.  There are different strengths of ND filters available, rated by their ability to absorb light in f stops.  They range from 1 stop to 10 stops of light reduction.  A circular polarizer (CPL) also acts as a ND filters and usually has about 3 stops of light reduction.

Whenever I'm out shooting landscapes, I always get asked what types of filters I am using and why I use them.  When I was first starting out, the idea of putting pieces of glass in front of my lens didn't make much sense but now my glass feels naked without them there.  It will take some time to get used to using filters but it's well worth it.  Most things that filters used to do can now be done now in post-production or via exposure bracketing.  However, a polarizing effect and long exposure effect can not be accurately reproduced during post so no matter what people tell you, there is still a need for using filters in photography.  The graduated neutral density (GND) filter effect can be done in post production and some people don't use them but I like getting the image as close to correct as possible to being correct in camera so I still use the GND when the situation calls for it.    
30" exposure. notice silhouette of of person on lighthouse

 When choosing what filters to purchase, although there are cheaper options, it is worth getting high quality filters and polarizers or else they will provide a color cast which can't be corrected in post-production.  I recommend getting only Lee, Hitech, and B&W filters no matter your skill level, you will be able to notice the difference.

There are a couple options when choosing what type of filter is right for you.  There are circular filters that screw onto your lens's threads like the B&W 10 Stop ND Filter and the Variable 2-8 Stop ND Filter which I've heard good things about.  These types of filters work well but can cause vignetting in some situations and can be cumbersome to take on and off.  They are mainly used by amateurs who are first getting into long exposure photography and while they are great at what they do they aren't as versatile as having a filter holder using square or rectangular filters.
Adding filters to my foundation kit at a river in Thailand
I use a Lee Foundation Kit which attaches to your lens via an adapter that screws onto the lens.  The Lee foundation kit has 3 filter slots so a variety of filters can be used.  I use the Lee Big Stopper which is a 10 stop ND filter but very hard to find in stock.  Hitech makes a 10 Stop ND Filter that is easier to come by.   I also use a Lee 3 Stop ND Filter which is great for situations where you don't want as long of an exposure as the 10 stop filter.  I almost always use a Lee 4x4 Circular Polarizer which besides acting as a 3 stop neutral density filter also intensifies blue skies, increase color saturation, and eliminates unwanted reflections.  I  keep a Lee 3 stop GND Filter in my bag to use where part of my image is brighter than the other part like during a sunset where the sky is much brighter than the foreground.  To hold all my filters in one place, I use this Filter Bag


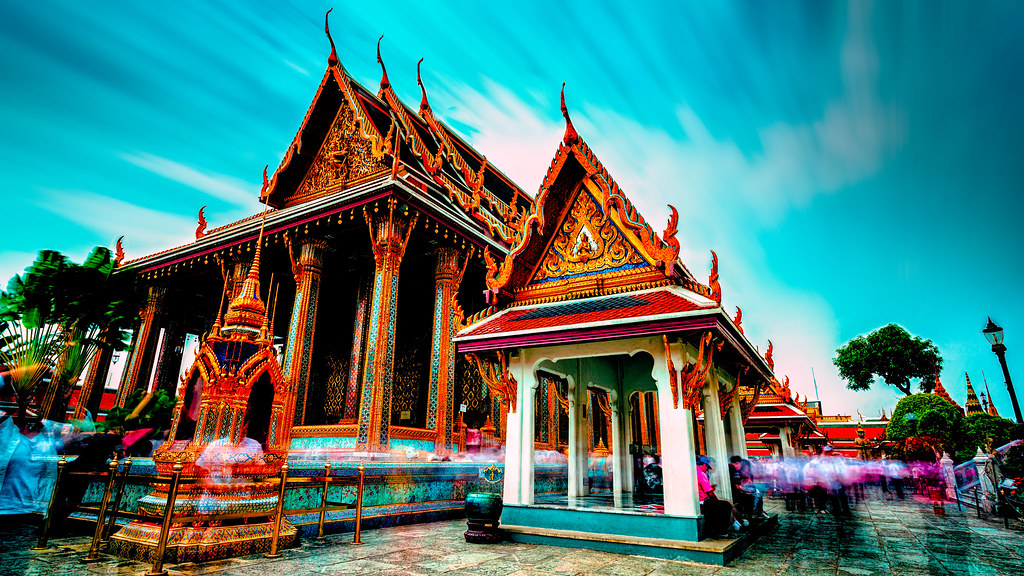
Blurred people and sky at the Grand Palace in Thailand
Having a good quality tripod is essential for creating a good long exposure as your camera needs to be completely still for at least 30".  There are many tripods out there but I currently use a Feisol 3441-T  carbon fiber tripod/head combo.  I've also have the less expensive but larger Manfrotto 055XPROB aluminum tripod with 498RC2 head and use it with great results. 
Once you have the correct filters, play around with different combinations to find a style of long exposure photography that you like.  For example, try stacking a CPL and 10 Stop ND filter and take a mid-day photo at base ISO at the ocean or river. Or use a 3 stop ND, GND, and CPL during sunset which will allow you take a 30 second photo and get a nice motion blur of your subject.  The effect in a crowd is also cool, if people are moving they won't show up in your photo.  If they stop briefly they may appear semi-transparent or blurred which creates motion in the scene depending on exposure.  There is no wrong answer here, think of these filters as a tool once you have more experience, you'll start to get a better feel of situations that will work for long-exposure photography and situations that won't work.

180" exposure flattens out waves and blurs clouds
Figuring out the correct exposure settings for a long exposure can be tricky, especially at night.  For long exposures, I always use the "live mode" to both focus and meter my shot.  When using 10 stop filters, it is sometimes necessary to take off the filters to focusing the shot.  Once the shot is focused, the filters can be put back on so correct metering can be achieved.  In camera, you are limited to the maximum exposure time of 30".  With a intervalometer, you have the ability to use "Bulb" mode to take exposures for as long as you wish.  I recommend this affordable offbrand intervalometer which I use that does a fine job but only costs a fraction of what Canon's does.  I always use aperture priority mode and set my aperture to f/8.  I then lock in the ISO at 100 and let the camera meter the shot.  I find that setting the EV to +1 is the way to go as it gives more shadow details.   If the camera metering is not working well, you can deduce the correct exposures using the following formula:

T(n) = t x 2^n
n = Total stop value of all ND filters you are using
t = Metered shutter speed without filters attached
T(n) = Exposure time to use

If you don't like to deal with math (like me) you can do a short high ISO shot with your filters attached and lower the ISO while increasing she shutter speed.  Each time you lower the ISO one stop, double the exposure time.  If that is too difficult or to make subtle changes, just use your camera's metering to get the exposure and change your EV to +2 or +3 or whatever is necessary.   For longer shots this might not be ideal but it works and as a bonus you could then even do an HDR (I'll do a separate post on HDR's/exposure bracketing sometime in the future)

Feel free to comment if anyone has questions regarding anything I covered in this post and get out there shooting!

Tuesday, June 4, 2013

1st Post!

This is my first ever blog but I will try to update this regularly with new techniques, reviews, or just my thoughts related to photography.

Enjoy!